You might want to disconnect the iPhone from Mac completely or just want to turn off certain features. It could be because of privacy, battery-saving, data-saving, or for a minimalistic lifestyle. Nevertheless, we’ll help you out. Note: The articles cover steps for both Mac and iPhone. It works if you disable settings from any of the devices. You can choose the device depending on your preference or Apple ecosystem setting.
1. Stop iCloud Sync Between iPhone and Mac
As soon as you set up your device with the same Apple ID, iCloud sync is automatically turned on for major apps and services. Now, depending upon your need, we can un-sync iPhone from Mac or turn off sync for certain apps, like disconnecting iPhone Photos from Mac.
Disable iCloud Sync on MacBook
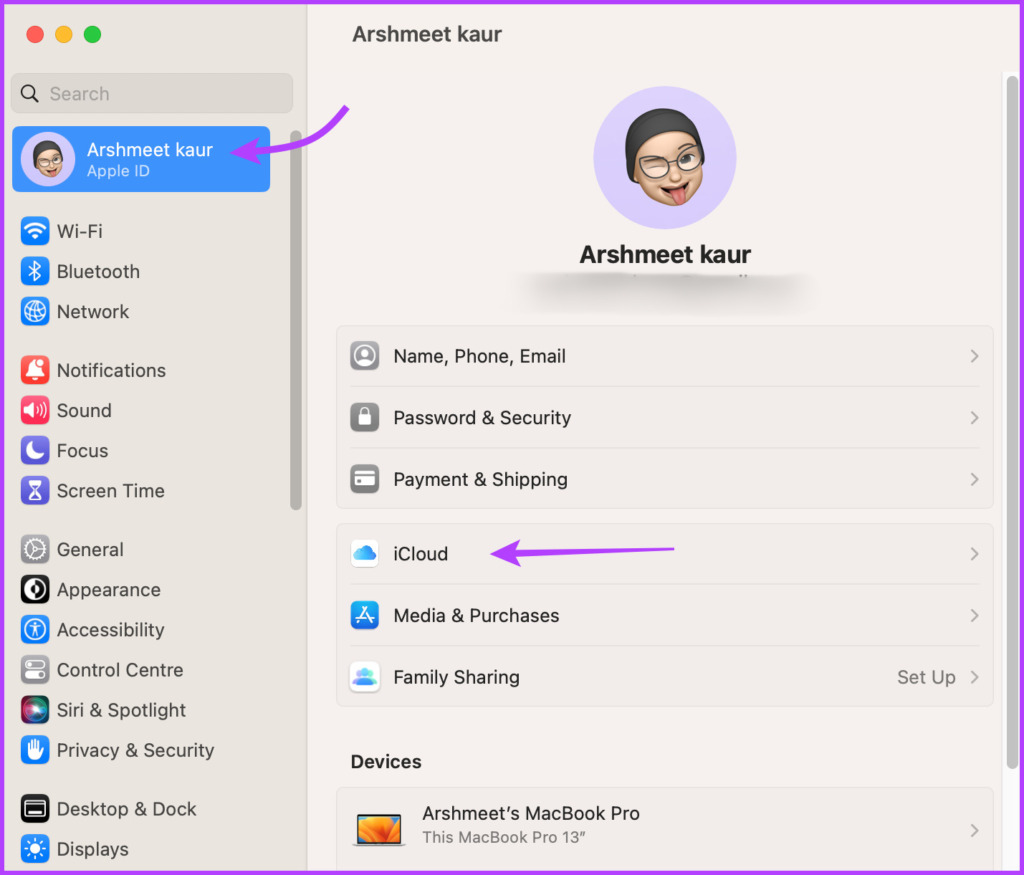
Step 1: Go to Apple Menu and select System Settings/System Preferences. Step 2: Click your Apple ID (profile name and image). Step 3: Select iCloud. Step 4: Click and then turn off the feature you don’t want to sync between your iPhone and Mac.
Disable iCloud Sync on iPhone
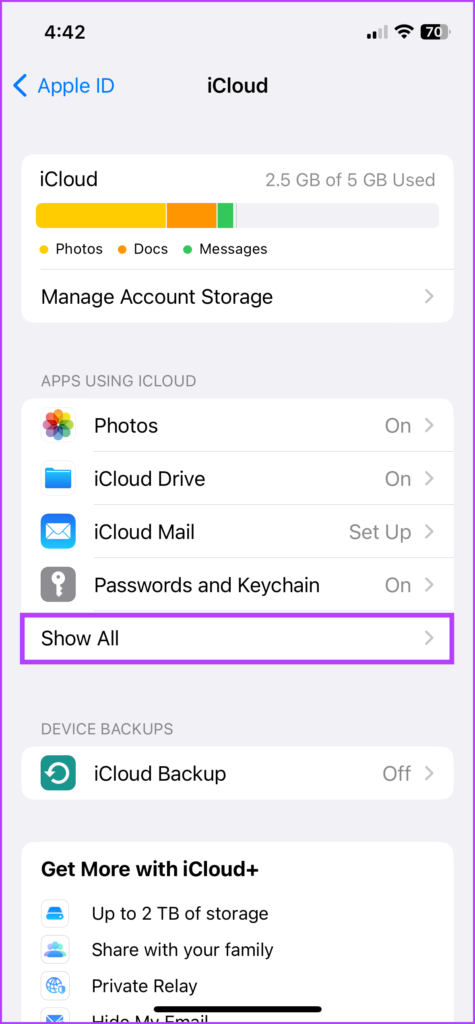
Go to the Settings app → tap your name from the top → iCloud → Show all → turn off the features or app sync as per preference. Supposedly, if you want to keep iCloud sync on for one device and off for the other, the steps, as shown above, would suffice. However, before you turn it off, you might want to download iCloud content on the device. Check out the next three sections for assistance.
Step 1: Take iCloud Drive Files Offline
Follow these steps to save any iCloud synced folders/files on Mac and files stored in the Files app (iCloud Drive folder) on iPhone locally.
On Mac: Click Apple Menu → System Settings/System Preferences → Apple ID → iCloud → iCloud Drive → Turn Off → select Keep a Copy.
On iPhone: Go to Settings → tap your name from the top → iCloud → iCloud Drive → toggle off Sync this iPhone → tap ‘Turn Off Syncing iCloud Drive.’
Step 2: Save Notes Locally on Your Device
By default, Notes are saved on iCloud Drive to allow sync across devices. Subsequently, if you’re turning off the sync and still want to access some of the notes, here’s what you need to do.
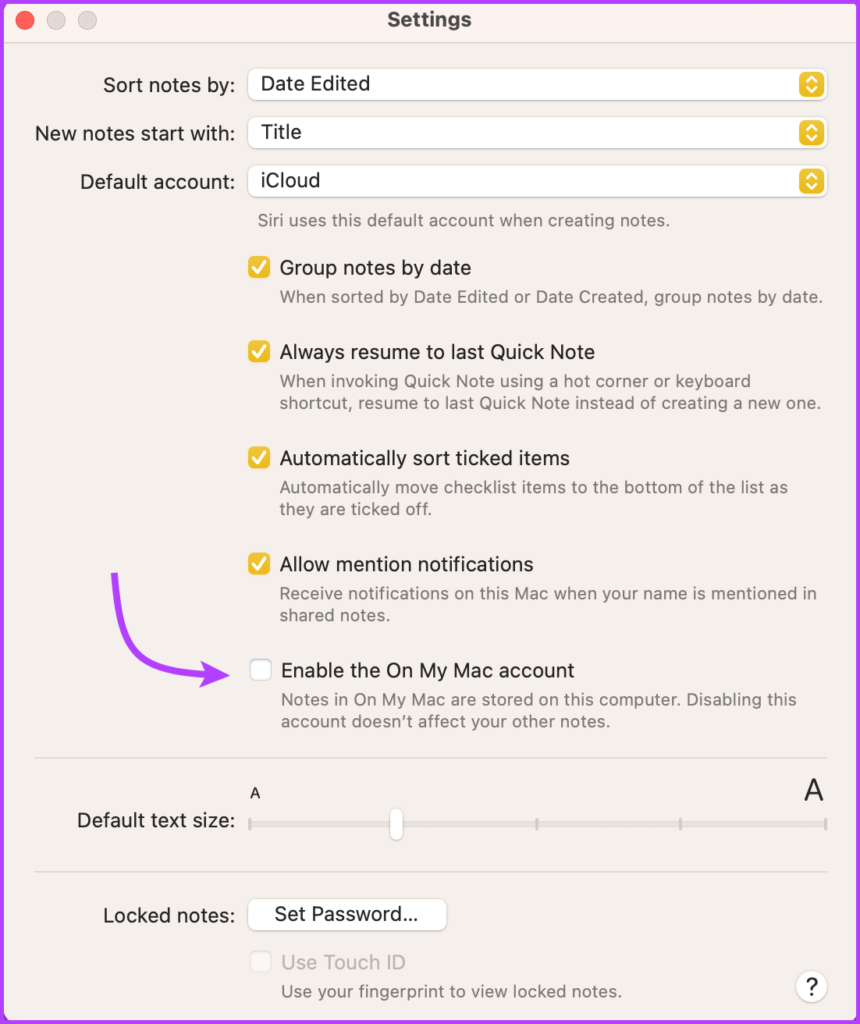
On Mac: Launch Notes → select Notes from the menu bar → Settings/Preferences → check ‘Enable the On My Mac account’.
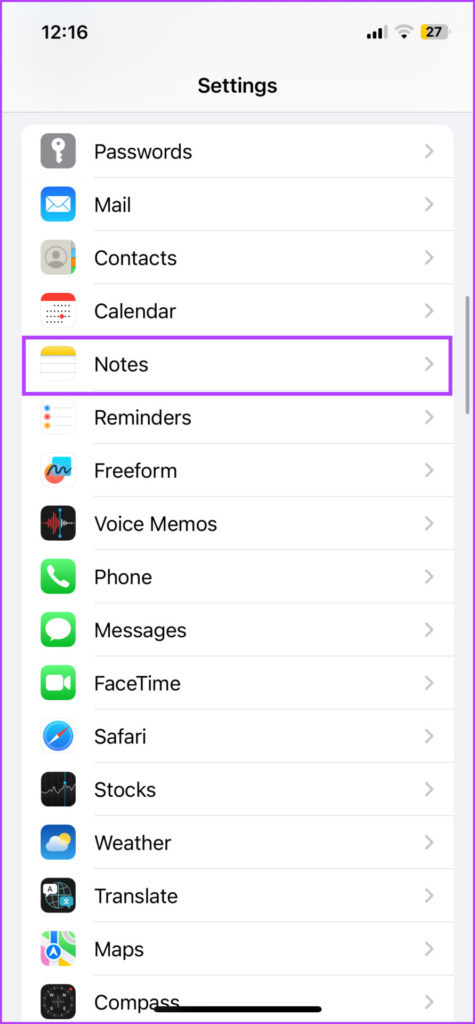
On iPhone: Go to Settings → Notes → turn the toggle for ‘”On My iPhone” Account’.
Note: If you’re saving notes on a device and have turned off iCloud sync, the changes henceforth would not be saved on the iCloud.
Step 3: Change Safari Download Location
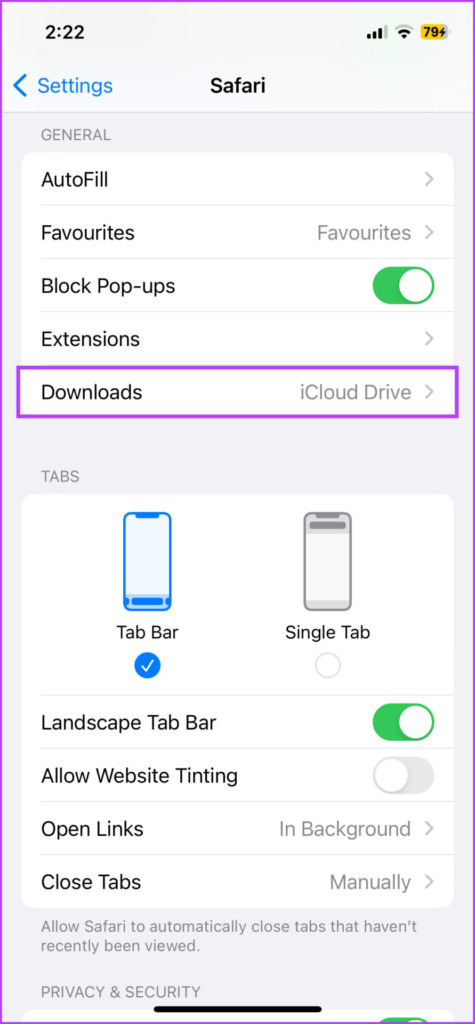
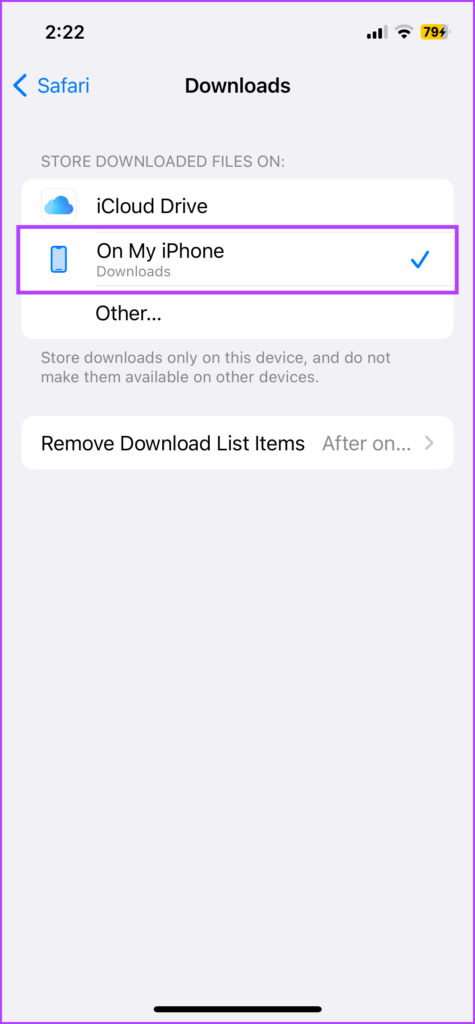
The Safari downloads on iPhone are saved in iCloud Drive by default. And though you might have transferred the previous iCloud drive files offline, it’s wiser to change the download location for the future. On your iPhone, launch Settings → select Safari → scroll down and tap Downloads (under General) → select On My iPhone or Other. While Safari download on Mac is usually designated to Downloads (local folder), let’s check that off the list to be 100% sure. Open Safari on your Mac → select Settings/Preferences → General Tab → click on the drop-down menu next to File download location → choose the preferred option.
2. Remove the Device From Apple ID
While turning off iCloud sync breaks the cloud connection between the two devices, removal from Apple ID severs all bonds. It will not just disconnect, but also erase the device, i.e., no Find My or iCloud sync or other related feature will be accessible from that Apple ID. So, why are we ranking this method so high? Because using two different Apple IDs is a foolproof way to disconnect iPhone and Mac; especially, if you want to end all ties between the two devices. Note: Only use this method for extreme case scenarios, like before selling your iPhone or Mac, or using different devices for personal and professional use.
Remove iPhone From Apple ID on Mac
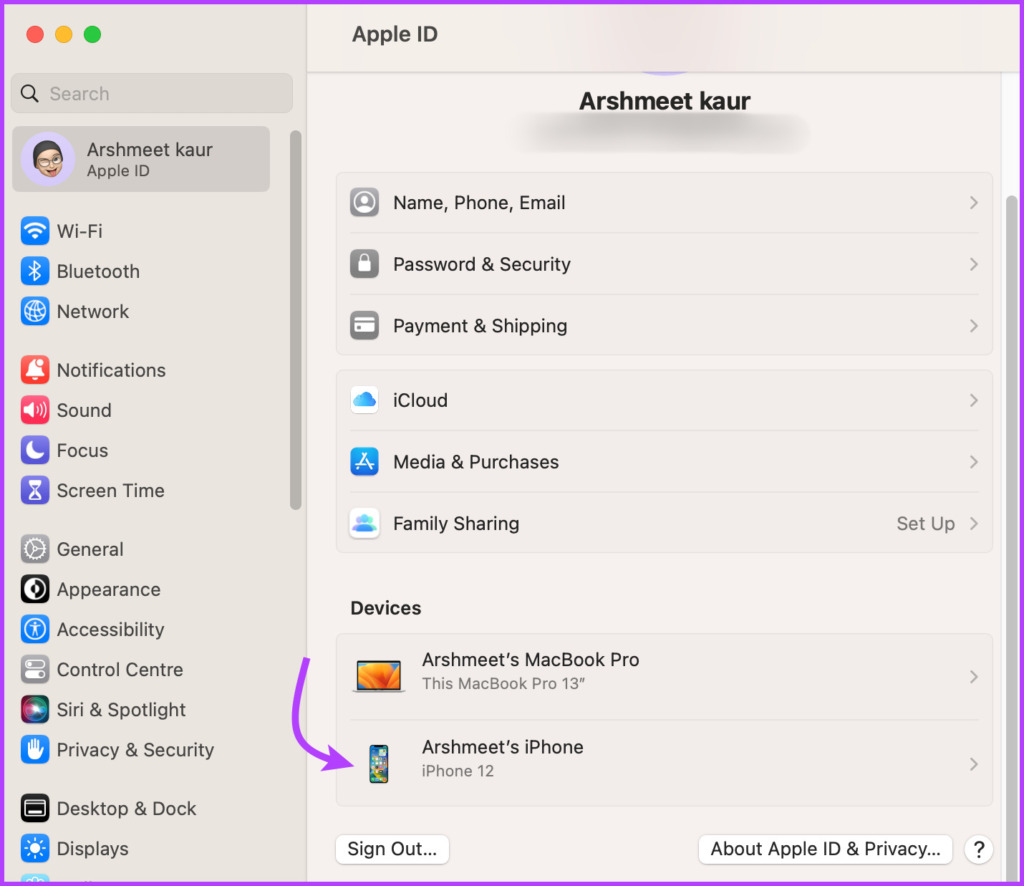
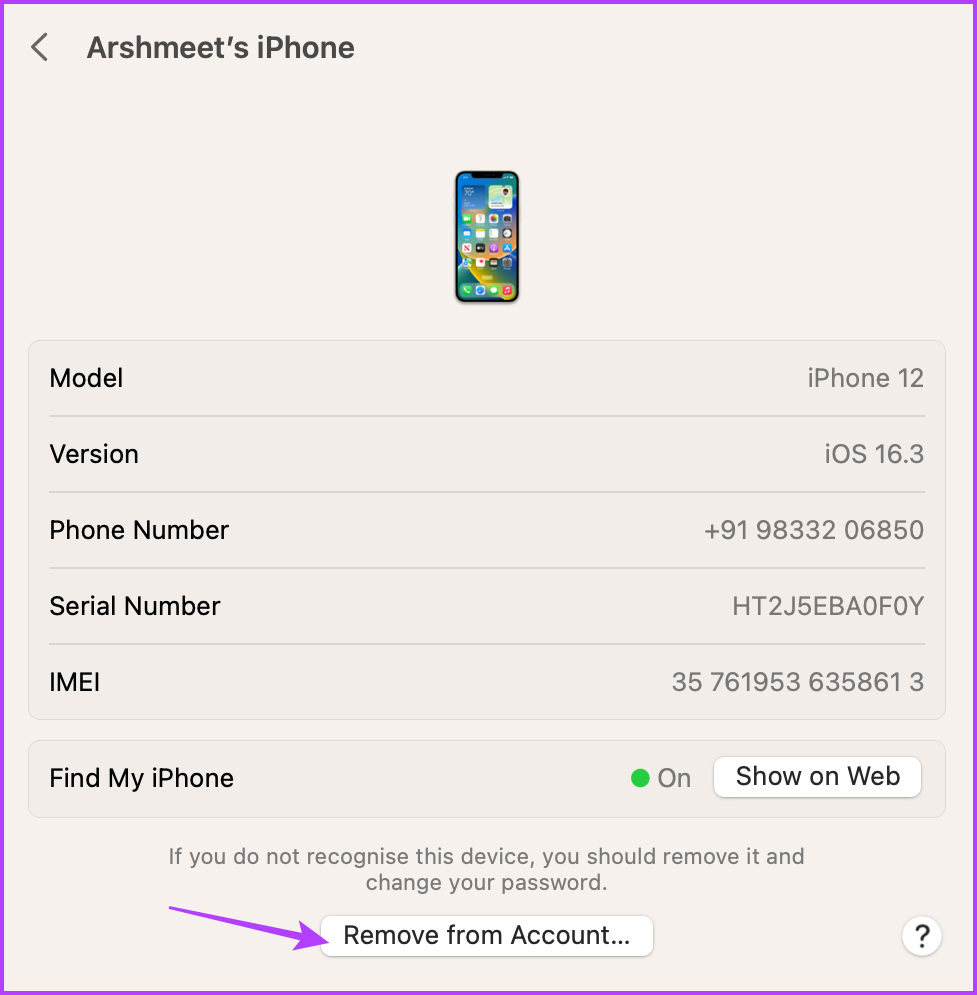
Step 1: Go to Apple Menu → System Settings/Preferences → Apple ID. Step 2: From the Devices section on the right, select your iPhone. Step 3: Click Remove from Account. Step 4: Click Remove again to confirm the action.
Remove Mac From Apple ID From on iPhone
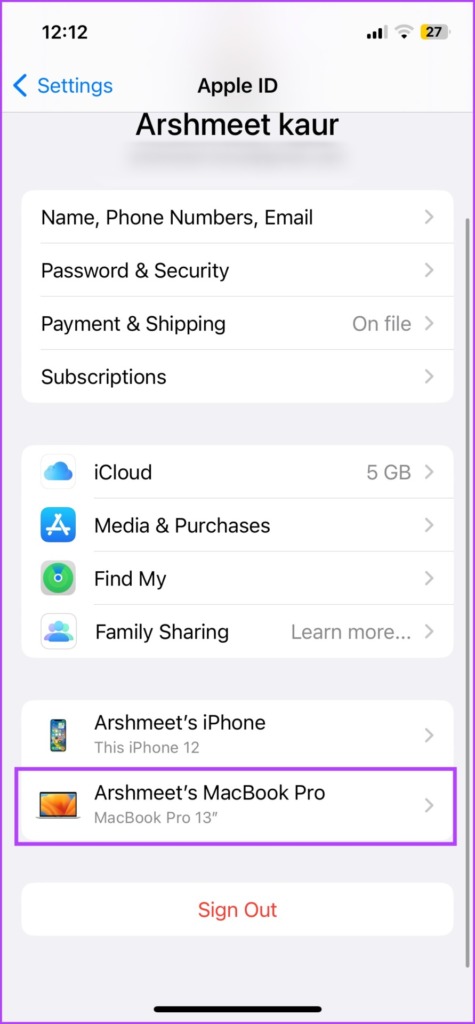
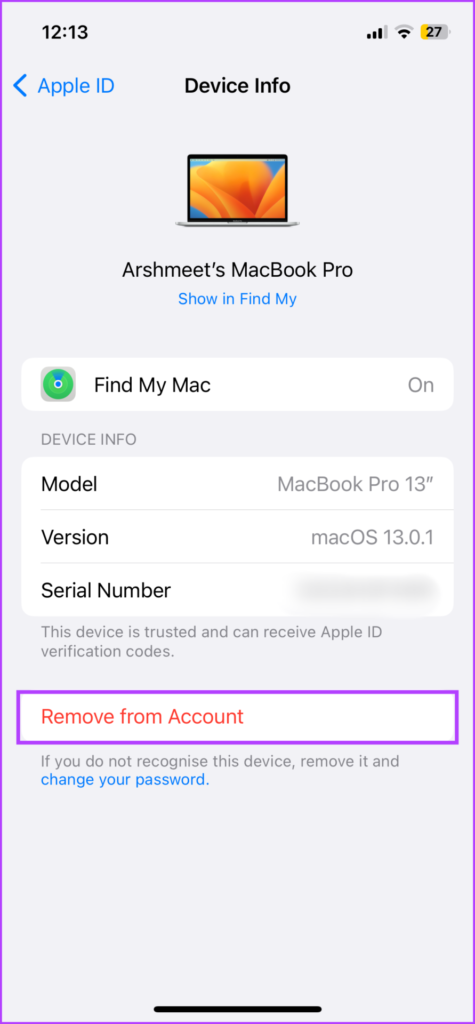
Go to Settings → click on your name from the top → select the Mac from the devices list → tap Remove from Account and then Remove again to confirm.
3. Unpair the Bluetooth Connection Between iPhone and Mac
From Handoff to AirDrop, Bluetooth is the building block for many interconnected features. And though we cover how to disable those features later, this one is a quicker and simpler way to disconnect iPhone from Mac. Yes, you can turn off Bluetooth, but then you’ll also disconnect other devices like Apple Watch, AirPods, Mouse, etc. It’s wiser to unpair iPhone and Mac to avoid auto-connection between the two.
How to Unpair Your iPhone From Mac
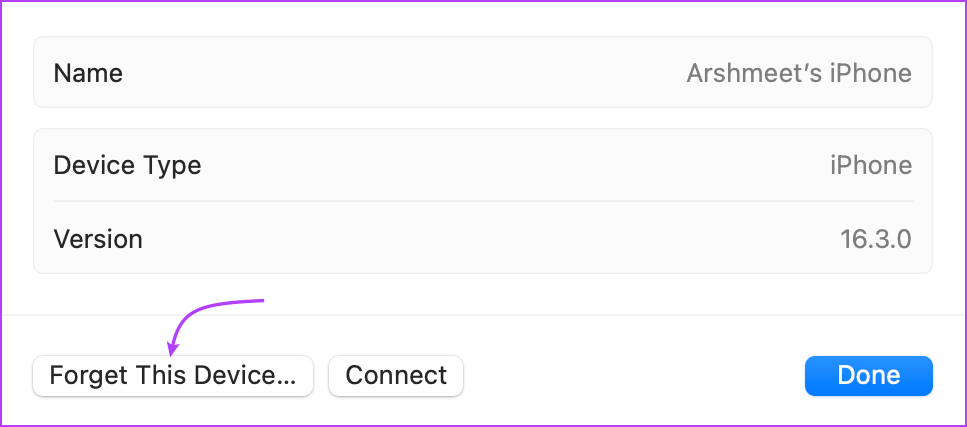
I. For macOS Ventura and later Step 1: Click the Apple menu and select System Settings. Step 2: Select Bluetooth from the sidebar. Step 3: You’ll spot the iPhone under My Devices or Nearby Devices. Step 4: Click the i icon next to the iPhone’s name. Step 5: Here, select Forget This Device and then Forget Device again to confirm. II. For macOS Monterey or earlier Click the Apple Menu → System Preferences → Bluetooth → look for the iPhone → click the X next to it → click Remove.
How to Unpair Mac From Your iPhone
Step 1: Launch Settings → go to Bluetooth. Step 2: Tap the i icon next to your Mac’s name. Step 3: Next, select Forget This Device and then Forget Device again to confirm.
4. Turn Off Handoff Between iPhone and Mac
Handoff is a key instrument for seamless integration in the Apple ecosystem. In fact, for most continuity features, like Continuity Camera, Continuity Markup, Universal Clipboard, etc., it’s a requirement. So, turning it off will not only stop nearby device switches but also disable multiple other interactive features between Apple devices.
Disable Handoff on Mac
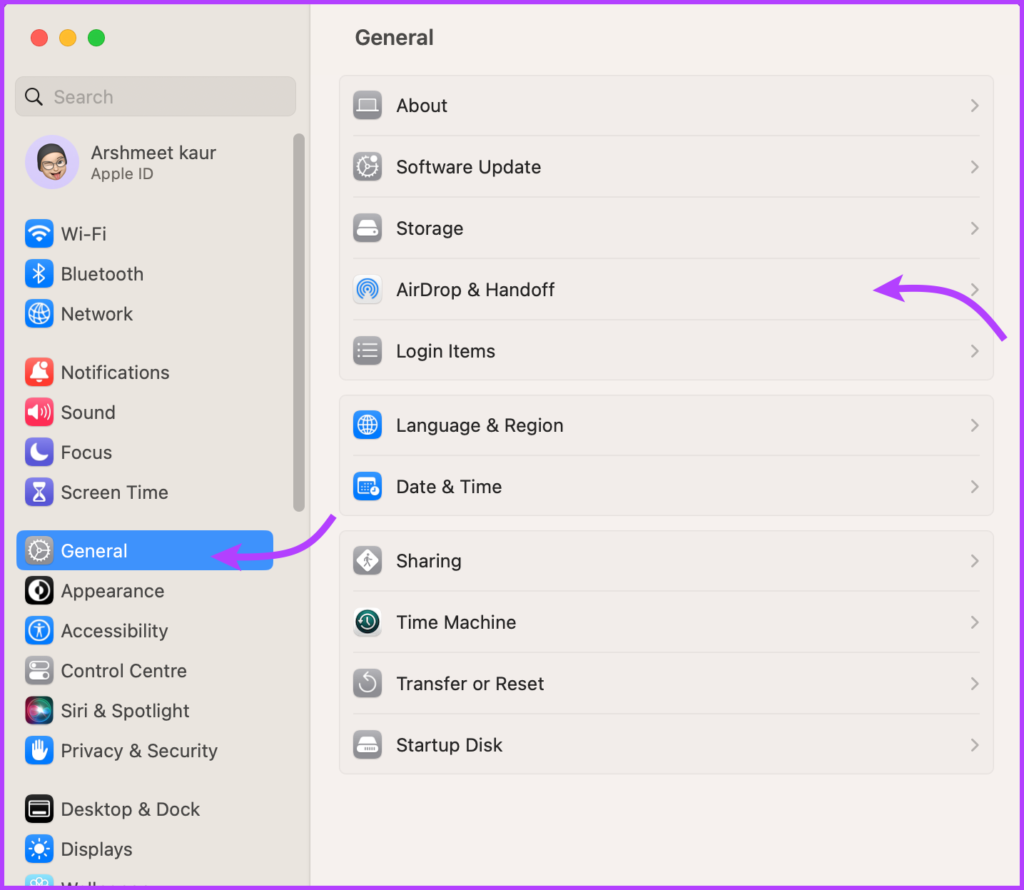
For macOS Ventura and later Step 1: Click the Apple icon → System Settings → General. Step 2: Select AirDrop & Handoff. Step 3: Toggle off ‘Allow Handoff between this Mac and your iCloud devices’. Step 4: Finally, select Don’t Allow Handoff. macOS Monterey and earlier Click the Apple icon → System Preferences → General → deselect ‘Allow Handoff between this Mac and your iCloud devices,’ from the button on the page.
Disable Handoff on iPhone
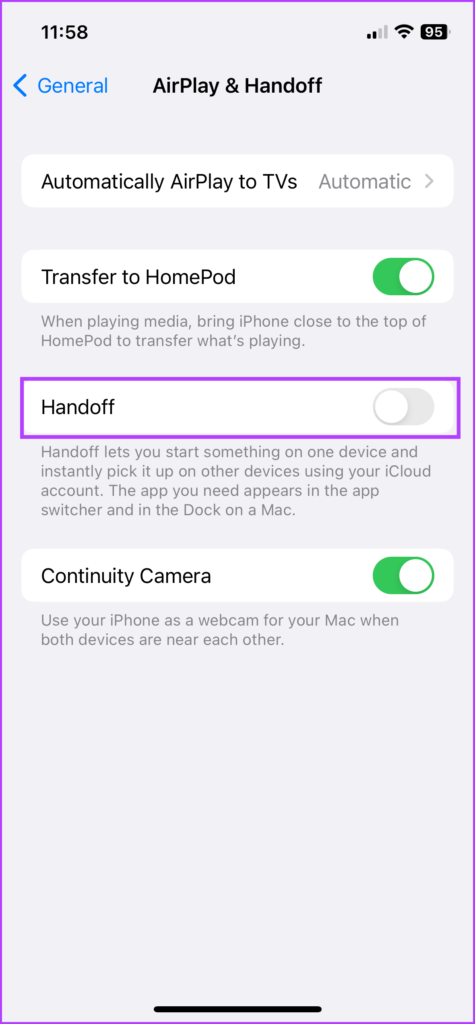
Go to Settings → General → AirPlay & Handoff → toggle off Handoff Note: If you own multiple Apple devices, disable Handoff on any one device. This way, you can still use the feature with the rest of the devices.
5. Stop Receiving Messages From iPhone to Mac
Text Message Forwarding is a smart way to sync your SMS and iMessages with Mac. But if you don’t enjoy your Mac buzzing every time you receive a message, follow the steps below.
Disable Message Sync From iPhone on Mac
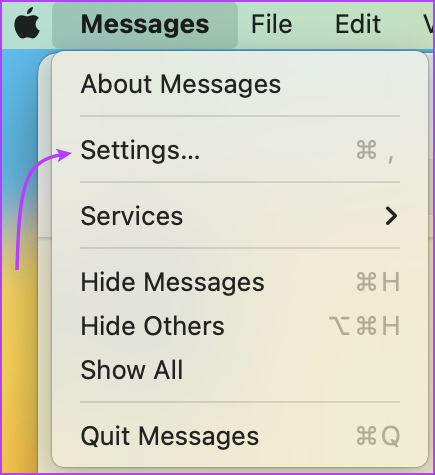
Step 1: Launch the Messages app on Mac. Step 2: From the menu bar, select Messages and click on Settings/Preferences. Step 3: Go to the iMessage tab. Step 4: Here, click Sign Out to disable Messages altogether. Alternatively, you can uncheck ‘Enable Messages in iCloud’ to turn off SMS but receive iMessages on Mac. Tip: You can press ‘Cmd + ,’ to access Settings/Preferences for the currently active app.
Turn Off Text Message Forwarding on iPhone
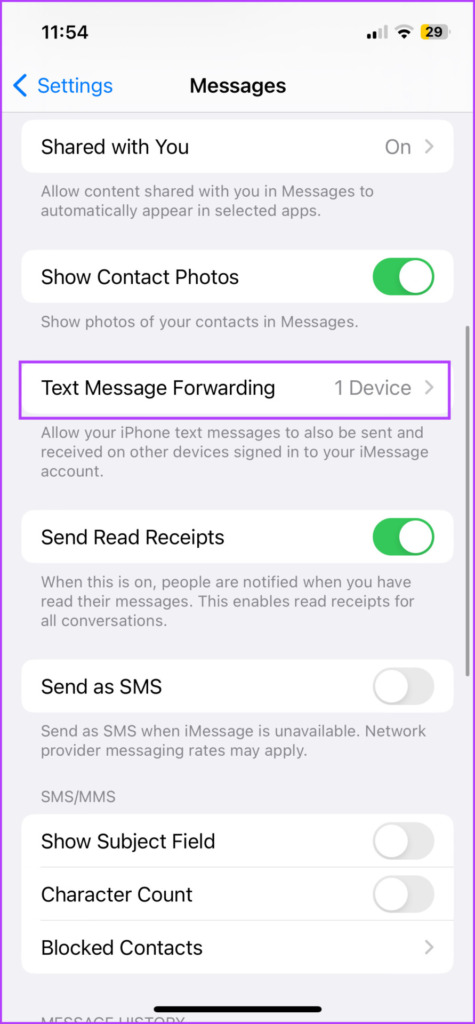
The above method would suffice to unlink message sharing between iPhone and Mac. However, if you want to disconnect messages from every other Apple Device, go to Settings on your iPhone → Messages → scroll to Text Message Forwarding → and Toggle off the Mac from here.
6. Disconnect Phone Calls on a Mac
If you consider message sync a nuisance, simultaneous ringing of Mac and iPhone during a call is a pure annoyance. So, let’s stop phone calls on Mac at the earliest.
Turn Off/Stop Phone Calls on Mac
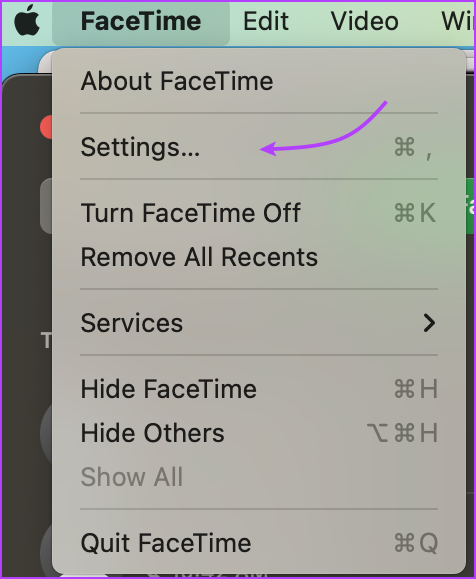
Step 1: Open the FaceTime app. Step 2: Click FaceTime from the menu bar → select Settings/Preferences or Cmd + ,. Step 3: In the General tab, uncheck Calls from iPhone. Note: If you also want to stop FaceTime calls Handoff, click Sign Out at the top
Disable Calls on Other Devices on iPhone
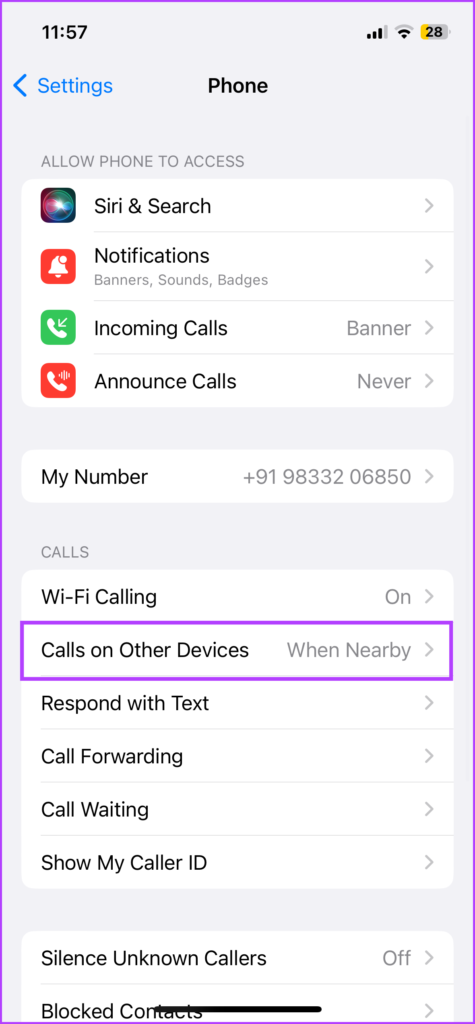
Step 1: Launch Settings and go to Phone. Step 2: Tap ‘Calls on Other Devices’. Step 3: Now,
To disable calls on just Mac: Turn off the toggle next to your Mac under Allow Calls on. To disable calls on all Apple devices (iPad or Apple Watch): Turn off the toggle for ‘Allow Calls on Other Devices’.
7. Disconnect the Mac From iPhone Personal Hotspot
Undeniably, most iPhone and Mac users have taken advantage of the feature at some point. But if you want to stop an iPhone’s hotspot from auto-connecting to your Mac, here’s what you need to do. If using macOS Ventura or later Step 1: Click the Apple icon from the menu bar and select System Settings. Step 2: Select Wi-Fi from the sidebar. Step 3: Scroll down to the bottom and turn off the toggle for ‘Ask to join hotspots’. If using macOS Monterey or earlier Go to System Preferences → Network → Wi-Fi → deselect ‘Ask to join Personal hotspots’. Simultaneously, you can also stop iPhone personal hotspot from turning on automatically for safety measures. However, the step is unnecessary as we’ve already switched off the setting from Mac.
8. Disable the Wi-Fi Connection Between iPhone and Mac
Very few users know and experience this feature, chiefly because it’s turned off by default. Although, if you see your iPhone in the Finder’s sidebar even when it is not connected to Mac via USB, your iPhone and Mac are syncing via Wi-Fi. You might have turned on content sync at some point in the past. So, let’s turn that off to remove the iPhone connection from the Mac. Step 1: Connect your iPhone to the Mac via a USB cable. Step 2: Open Finder and click the iPhone’s name from the sidebar. Step 3: Go to the General Tab (if not open already). Step 4: Under Options, deselect ‘Show this iPhone when on Wi-Fi’.
9. Disconnect AirDrop Between iPhone and Mac
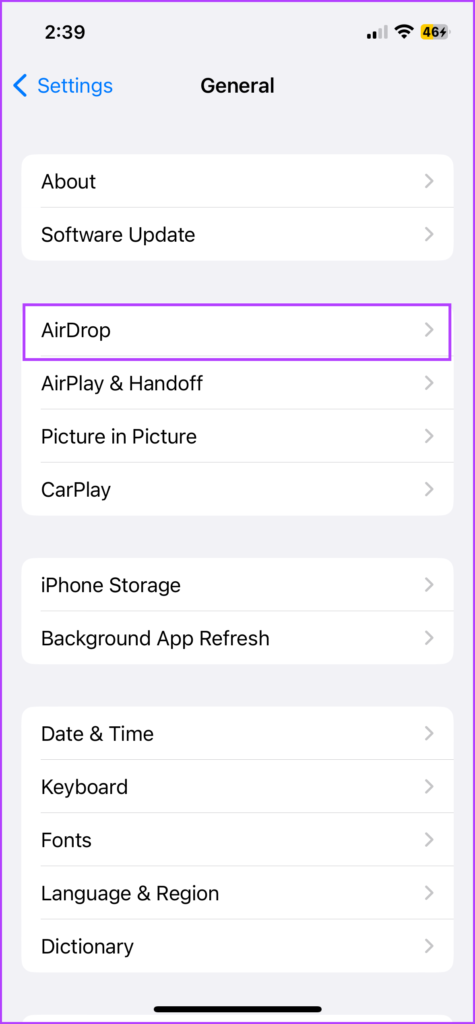
AirDrop is a boon, it’s present when you need it and almost always works (check out this guide if you’re facing issues). Subsequently, it stays in the background without affecting battery, data, or anything (and that’s why we’ve kept it at last) However, you might want to disable AirDrop when not in use for privacy purposes and to unlink your Apple Devices. To turn off AirDrop on Mac, Step 1: Launch Finder and select AirDrop from the sidebar. Step 2: Here, click the drop-down menu next to ‘Allow me to be discovered by:’ (from the bottom). Step 3: Select No One. Alternatively, you can go to System Settings → General → AirPlay & Handoff → in the drop-down menu next to AirDrop, and select No One. So long as Mac’s AirDrop is disabled, the iPhone will not be able to connect. Although, you can disable the iPhone’s AirDrop as an added precaution ( Settings → General → AirDrop → Receiving Off).
Unsync iPhone and Mac
This here is why everyone raves about the Apple ecosystem. To truly remove your iPhone from the Mac, you need to disable and uncheck so many features. We guess, it takes a deep dive into ways to disconnect to realize and emphasize the extent of the connection. What would you say is the best thing about Apple’s Ecosystem? Share your favorite feature in the comments section below.
